Cybox Shaders for Minecraft 1.11.2/1.10.2/1.9.4/1.7.10

0 التعليقات


Despite the fact it is more than a year old today, the Cybox Shaders Pack is still one of the best-looking shaders which are compatible with Minecraft 1.11. This compatibility rolls back a few versions, and the mod works just fine with Minecraft versions as old as 1.6.4, so if you’re stuck that far back you can still get a decent shader pack in Cybox. You don’t need any supporting software like Optifine to make the Cybox shaders work, but like always, the Better Skies and Better Glass which are included with Optifine in most downloads can still improve the appearance of these textures in your world.


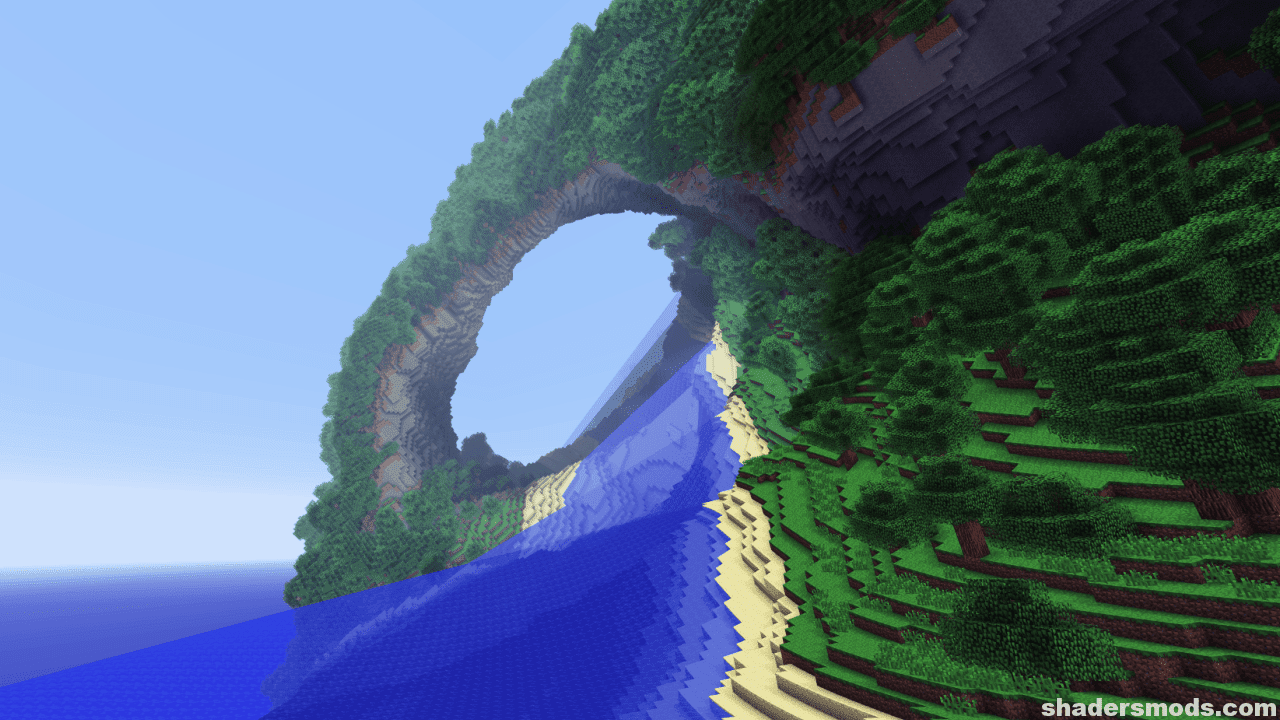
The shadow effects in Cybox Shaders Mod are some of the best you will see in any shader pack. Just to name one good example, the shadows in this mod actually account for the spaces between leaves when sunlight is shining through the foliage of trees. That is, you don’t just get a solid black shadow on a nearby surface, but you see the individual leaves and the spaces between them, where the light is able to make it all the way through. It’s kind of hard to explain in words – you’ve really got to see Cybox in action to see how good it looks.


As far as requirements go, you’re going to need a decent GPU if you want to run Minecraft with the Cybox Shaders Pack installed and enabled. This is because of the constant rendering and re-rendering of visuals as the sun moves through the sky, or moving leaves obstruct light, or clouds float on by and create shade for the world down below. This shader pack will put a greater level of strain on your PC and system resources, so you’ll have to have something in reserve if you want to use it. Integrated graphics aren’t going to do the trick here.


But if you’ve got the graphics card, memory and processing power to play with the Cybox Shaders Pack turned on, then by all means, give it a go. It’s one of the best-looking shader packs for Minecraft 1.11/1.10.2 and 1.9.4, and even the newer animations and items from the combat update have been figured into the lighting and shadows. Overall, Cybox would probably get 8/10 or even 9/10 if it was being graded on that sort of scale. Since it isn’t though, just saying it’s a great, solid shader pack will have to do.


Tips:
  • Requires Optifine or GLSL Shaders Mod
  • Requires Minecraft Forge API for most of the versions

How to install Cybox Shaders Mod?


  1. The first step is to download and install the GLSL Shaders Mod or Optifine on your Minecraft client!
  2. Now go to:
    • Windows => %appdata%\.minecraft
    • Mac OS X => ~/Library/Application Support/minecraft
    • Linux => ~/.minecraft
  3. Search for the “shaderpacks” folder.
  4. Move the downloaded .zip into the shaderpacks folder.
  5. Now you can select shader in-game from Options / Video Settings / Shaders. If not, check to make sure you placed the “.zip” file in the correct directory.
  6. That was all!

Download Links for Cybox Shaders Pack

for Minecraft 1.11/1.10/1.9/1.8/1.7


Continue reading

rre36’s Shaders for Minecraft 1.11.2/1.10.2/1.9.4/1.7.10

0 التعليقات


If you’re on the lookout for a shader pack that will work with newest and older versions of Minecraft, you have many options. One of these is rre36’s Shaders, which were released back in February of 2014 and have since become a discontinued project. That means there are no more updates coming, at least not official updates from the shader pack creator, so what you see is what you get. And what there is to see is actually pretty good. Brighter lights, darker shadows, and very little gray coloring are what you can expect from rre36’s Shaders, among other cool features.


The early hours of the morning in Minecraft are normally dark, kind of like the early hours of the evening once the sun goes down and the stars come out. However, in rre36’s Shaders mod, the beginning of the day kind of explodes with bright, bold, orange colors. It doesn’t seem very realistic and it can actually be kind of an eyesore, but you’ll have to get a look for yourself before you really understand. The light just doesn’t look natural – or maybe it would look natural if Minecraft was taking place on some distant, foreign planet which was nestled right up against a star.


Thankfully the other times throughout the day look much better. At high noon, you get crisp, clear, blue water, along with bluer skies, greener grass and trees, and some nice rippling effects in bodies of water. Because this shader pack is already a couple of years old, its requirements are somewhat lax when compared to the more modern shader packs you see today. This is kind of a good thing, since it means that more players will be able to use rre36’s Shaders without having to worry about hardware lag or a massive drop in FPS while playing Minecraft.


Because rre36’s Shaders are based on Chocapic13’s Shaders, you’ll probably notice some elements from the latter in the former. But this pack only uses Chocapic13’s as a foundation – it goes off on its own and makes many adjustments to Minecraft’s visuals, including changes to waving elements, colors, the shadow filter effect, and even a motion blur which works with non-vanilla blocks, like those from mods. Overall rre36’s Shaders are pretty solid, but they are still old, but still looks very good on new versions of Minecraft.


rre36’s Shaders for Minecraft Changelogs


v7 for Minecraft 1.10.2 and 1.9.4
  • Ported Lens Features and Particles
  • Improved Shadow-look while raining
  • Added Color variables only for Sky and Fog
  • Added IMAX DOF-profile (google IMAX for more information)
  • Little Torchlight changes
  • POM is disabled by default (activate it in gbuffer_terrain.fsh)
  • Ported Sildur’s Block Reflections
  • Ported my Waving Elements
  • Clouds are getting bigger while raining
  • Better Wind-Fading from clear to rain
  • Dynamic Waterwave-strength
  • Changed Cloud-Wind-speed
  • Improved Midnight-Godrays
  • Increased Sun Path Rotation
Tips:
  • Requires Optifine or GLSL Shaders Mod
  • Requires Minecraft Forge API for most of the versions.

How to install rre36’s Shaders Mod?


  1. The first step is to download and install the GLSL Shaders Mod or Optifine on your Minecraft client!
  2. Now go to:
    • Windows => %appdata%\.minecraft
    • Mac OS X => ~/Library/Application Support/minecraft
    • Linux => ~/.minecraft
  3. Search for the “shaderpacks” folder.
  4. Move the downloaded .zip into the shaderpacks folder.
  5. Now you can select shader in-game from Options / Video Settings / Shaders. If not, check to make sure you placed the “.zip” file in the correct directory.
  6. That was all!

Download Links for rre36’s Shaders Pack

for Minecraft 1.11/1.10/1.9/1.8/1.7

Credit: RRe36_Official


Continue reading

dvv16’s Shaders for Minecraft 1.11.2/1.10.2/1.9.4/1.7.10

0 التعليقات


One of the first things you’ll notice about dvv16’s Shaders mod is the abundance of purples, pinks and deep, dark blues in the environment around the world. The sky, especially early in the morning and early in the evening, comes alive with colors that seem almost unnatural, and which you definitely haven’t seen in any other shader pack before. The days are brighter and the nights are darker than most you’ve probably seen too. However, dvv16’s Shaders are kind of old now, but still works with the latest version of Minecraft. If that doesn’t work for you, there’s little reason to keep reading this review.


One of the things that really set this shader mod apart from others is the material from which it came. Unlike so many others which are based on Chocapic13’s Shadersdvv16’s Shaders mod actually uses robobo1221’s Shaders as a foundation, so players who have used that mod will probably see some similarities between the two. While it manages to do many things right, this shader pack doesn’t seem to have any realistic reflections or reflective surfaces of any kind, so it does fall short there. Like many shaders, you’ll also need the original Shader Mod by Karyonix to make this thing work.


Because dvv16’s Shaders mod is decent but not great, it doesn’t come with the same heavy requirements that other, better shader mods tend to have. That means you might just be able to use this one with your on-board, integrated graphics, though naturally a better GPU and other gear will make things render more quickly and smoothly for you. The low requirements of dvv16’s Shaders make it a great first shader pack for players who are just trying to figure out how all this works. There’s nothing complicated about the installation either, so that’s a plus.


Whether or not dvv16’s Shaders can be recommended is all up to whether you love the combat update, or if you’re willing to dial back your Minecraft client version a few releases so it actually works. Using dvv16’s Shaders with the newest version of Minecraft will works but can result in bugs and crashes, all screenshots are made in Minecraft 1.10.2 and run very well without FPS drop. However, if you’re still using Minecraft 1.7.10 because of mods or for some other reason, then this would be a great shader pack for you to try out. It’s decent overall, neither really good nor really bad.

Tips:
  • Requires Optifine or GLSL Shaders Mod
  • Requires Minecraft Forge API for most of the versions.

How to install dvv16’s Shaders Mod?


  1. The first step is to download and install the GLSL Shaders Mod or Optifine on your Minecraft client!
  2. Now go to:
    • Windows => %appdata%\.minecraft
    • Mac OS X => ~/Library/Application Support/minecraft
    • Linux => ~/.minecraft
  3. Search for the “shaderpacks” folder.
  4. Move the downloaded .zip into the shaderpacks folder.
  5. Now you can select shader in-game from Options / Video Settings / Shaders. If not, check to make sure you placed the “.zip” file in the correct directory.
  6. That was all!

Download Link for dvv16’s Shaders Pack

for Minecraft 1.11/1.10/1.9/1.8/1.7
Credit: dvv16


Continue reading

Werrus Shaders for Minecraft 1.11.2/1.10.2/1.9.4/1.7.10

0 التعليقات


The Werrus Shaders pack brings realistic skies, clouds, lights and shadows into the world of Minecraft. Those lights and shadows are actually highly affected by the clouds in the sky, and those floating bits of fluff can cause streaks of darkness to roll across the land down below. You don’t get shadows like this in vanilla Minecraft. Realistic lighting effects like these are why most players download and install a shader pack in the first place, but not all shader packs have lighting like Werrus Shaders. Released in mid-February of 2015, Werrus Shaders is compatible with Minecraft 1.11.X and 1.10.X.


Work is being done currently to bring Werrus Shaders to a state where it will be fully compatible with Minecraft 1.11, but that time has not come yet. Because it borrows a few pieces from Chocapic13’s Shaders, this pack is actually a nice way to see bits and parts of that other, popular pack in action. The darkness in this shader pack is almost overwhelming when the sun goes down, so you may want to turn up your brightness setting if you plan on using it. This also makes it literally impossible to explore caves unless you bring along plenty of torches or other light sources to illuminate the way.


This isn’t like in vanilla Minecraft, where even in caves with no lights you can still see vague outlines and shapes of your surroundings. As for the requirements of the Werrus Shaders pack, they tend to be pretty average and right in the middle. You can use this pack with integrated graphics, but things aren’t going to look very good. On the other hand, a high-end GPU can take the visuals to another level altogether, giving you a Minecraft world that looks so good you might just never want to turn the Werrus Shaders off again.


Because there are two different versions of the Werrus Shaders pack, players with a variety of different PCs should be able to use it without a hitch. You have the standard version, and then you have the HFPS version, or High FPS version, which dumbs down some of the effects to lessen the drag on FPS which comes with turning on the shader mod. Other adjustments can be made to increase FPS, like cutting down the render distance and turning off reflections. Thankfully this shader pack doesn’t do much to change the appearance of water, so turning off reflections doesn’t really hurt anything.


Werrus Shaders for Minecraft Changelogs


V4.6 BETA for Minecraft 1.10.2
  • READDED BLOOM
  • CHANGED LENS FLARE
  • IMPROVED RAIN LENS
  • IMPROVED RAIN DROPS
  • IMPROVED WATER
  • IMPROVED GODRAYS
  • IMPROVED SHADOW
Tips:
  • Requires Optifine or GLSL Shaders Mod
  • Requires Minecraft Forge API for most of the versions.

How to install Werrus Shaders Mod?


  1. The first step is to download and install the GLSL Shaders Mod or Optifine on your Minecraft client!
  2. Now go to:
    • Windows => %appdata%\.minecraft
    • Mac OS X => ~/Library/Application Support/minecraft
    • Linux => ~/.minecraft
  3. Search for the “shaderpacks” folder.
  4. Move the downloaded .zip into the shaderpacks folder.
  5. Now you can select shader in-game from Options / Video Settings / Shaders. If not, check to make sure you placed the “.zip” file in the correct directory.
  6. That was all!

Download Link for Werrus Shaders Pack

for Minecraft 1.11/1.10/1.9/1.8/1.7

Normal:
HFPS (High FPS):

Continue reading

Acid Shaders for Minecraft 1.11.2/1.10.2/1.9.4/1.7.10

0 التعليقات


The Acid Shaders mod is like many other shader mods in that it affects the way lights, shadows and shade work in the world of Minecraft. It may have some issues working with the latest version of Minecraft (1.11.2) because Acid Shaders came around a few years ago, back before any of the new items, objects and models were added to the game. This shader pack doesn’t require any additional software or mods to work correctly, so you should be able to just install it and play with it, especially since it is not resource intensive like many other shader packs.


Unlike many shader packs which focus on creating a sense of realism by making light bend and move in a more realistic way in Minecraft, Acid Shaders is more for people who want a surreal experience that breaks away from reality. You can immediately see this in the psychedelic effects which occur on objects and environmental aspects that are far away from the player, or you. The farther you are from something, the more distorted it becomes thanks to this shader pack, which is doubtless what inspired the name Acid Shaders. Playing Minecraft with this enabled is almost like being on drugs.


Getting back to the requirements, though, GLSL Acid Shaders is actually pretty easy for most players to use. As the author has said before, if you can run Minecraft without issues, then you should be able to run Minecraft with Acid Shaders installed and get the improved visuals without suffering a major hit to performance and rendering speeds. This is not a resource-intensive shader pack like some others, but that is only because it doesn’t focus on lighting and shadow effects so much as distorting the landscape and altering the player’s perception of the world surrounding them in a different way.


If you’re looking for an interesting take on the same old Minecraft gameplay, you might really like the Acid Shaders shader mod. It makes the world look disturbing in a sense, and it will definitely make you do double takes, stop to blink and repeatedly ask yourself if what you’re seeing on the screen is what’s actually happening in the game. With low resource requirements, pretty much anyone who can play Minecraft can use Acid Shaders. However, because Acid Shaders doesn’t really work like most shader packs, many users will probably want to steer clear of it for something more like what they expect.


Acid Shaders for Minecraft Changelogs


r6 for Minecraft 1.10.2/1.11
  • Added the sky back into the background (it was just fog in r5)
r5 for Minecraft 1.9.4
  • Reformatted some more code.
  • Fixed the block outline bug. The transformation needs to be done inside gbuffers_basic, however doing so will cause the transformation to apply to all the gbuffers, so I added programs for most of the gbuffers (water didn’t need a program).
  • Made fog fancy instead of fast
  • Collapsed the World Space edition into the Screen Space edition. You can now enable World Space by un-commenting lines in the following files: gbuffers_terrain.vsh, gbuffers_entities.vsh and gbuffers_basic.vsh. You can also un-comment lines in the textured, textured_lit and weather programs, but the difference is not really worth the 30 seconds it would take you.
  • Released Animal Crossing Shaders (would have abbreviated as AC Shaders, but that would get confused with ACid).
Tips:
  • Requires Optifine or GLSL Shaders Mod
  • Requires Minecraft Forge API for most of the versions.

How to install Acid Shaders Mod?


  1. The first step is to download and install the GLSL Shaders Mod or Optifine on your Minecraft client!
  2. Now go to:
    • Windows => %appdata%\.minecraft
    • Mac OS X => ~/Library/Application Support/minecraft
    • Linux => ~/.minecraft
  3. Search for the “shaderpacks” folder.
  4. Move the downloaded .zip into the shaderpacks folder.
  5. Now you can select shader in-game from Options / Video Settings / Shaders. If not, check to make sure you placed the “.zip” file in the correct directory.
  6. That was all!

Download Link for Acid Shaders Pack

for Minecraft 1.11.2/1.11/1.10/1.9/1.8/1.7


Continue reading